

What’s Included
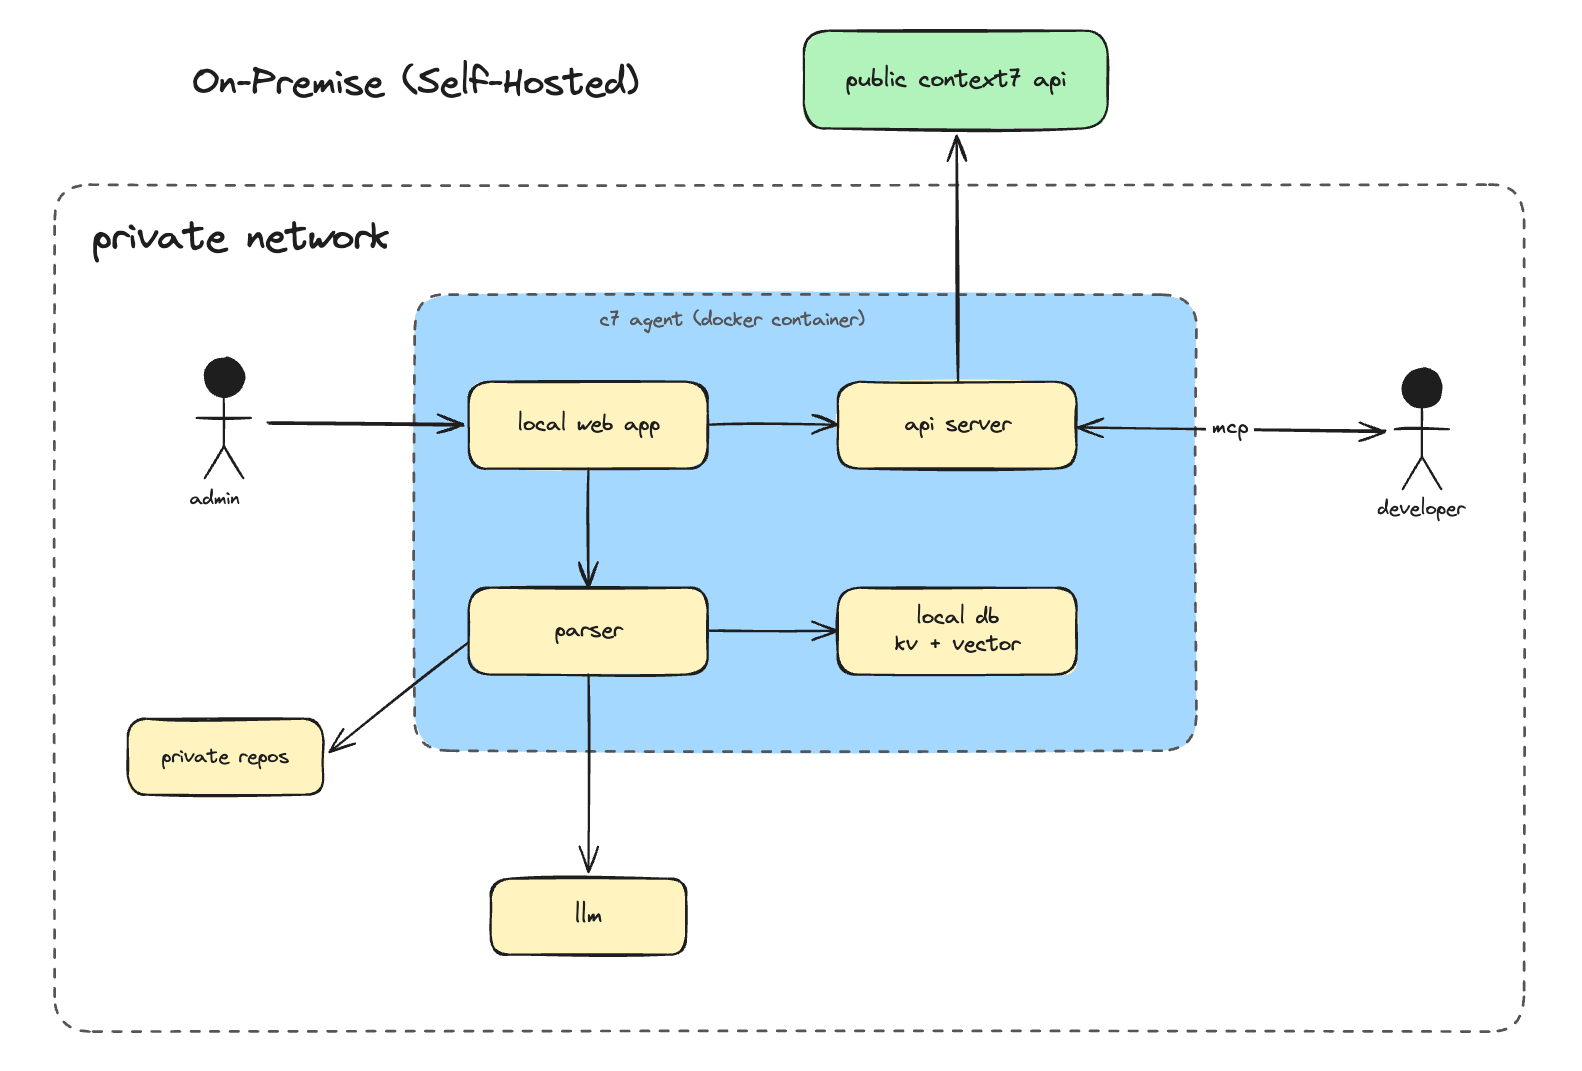
- Full Context7 parsing and indexing pipeline
- Local vector storage (no external vector DB required)
- Built-in MCP server. Works with any MCP-compatible AI client
- Web UI for managing indexed libraries and configuration
- REST API compatible with the public Context7 API
- Private GitHub and GitLab repository ingestion
Setup
1
Request a trial
Go to context7.com/plans and click On-Premise Trial. Fill out the request form. No credit card required. You’ll receive a 30-day full-featured license key via email once approved.
2
Deploy
Follow the deployment guide for your platform:
Docker
Deploy with Docker Compose
Kubernetes
Deploy on Kubernetes with raw manifests
3
Complete the setup wizard
Open
http://localhost:3000 in your browser. On first launch, the setup wizard guides you through configuring:- AI Provider - Choose OpenAI, Anthropic, Gemini, or a custom OpenAI-compatible endpoint. Enter your API key and model name.
- Embedding Provider - Use the same provider as your LLM, or configure a separate one for embeddings.
- Git Tokens - Add a GitHub and/or GitLab token for the platforms you use.
4
Ingest your first repository
From the dashboard, click Add Repository and enter a GitHub or GitLab URL. Once ingestion completes, your private docs are ready to query.You can also add libraries via the REST API:
Connecting Your AI Client
Point your MCP client at your deployment URL. Replacehttps://context7.internal.yourcompany.com with your actual host.
Claude Code
Cursor
Add to~/.cursor/mcp.json:
Opencode
Configuration
Environment Variables
These are set in yourdocker-compose.yml or .env file before starting the container.
AI provider keys, model settings, and git tokens are not set via environment variables. They are configured through the setup wizard and can be updated anytime from the Settings page in the web UI.
AI Provider Settings
Configured via the Settings page in the web UI.Examples
- OpenRouter
- Local Model (Ollama, vLLM)
Embedding Settings
By default, Context7 uses the same provider as your LLM for generating embeddings. You can configure a separate embedding provider if needed.Git Access Tokens
Configured via the Settings page in the web UI.
You only need tokens for the platforms you use. If you only parse GitLab repos, you don’t need a GitHub token, and vice versa. Create tokens with
repo scope (GitHub) or read_repository scope (GitLab) for private repository access.
Access Control
Admin credentials are set during first login (default:admin / admin). Change these immediately after setup via Settings > Change Credentials.
The Settings page lets you control which operations are available without authentication.
When a permission is off, the operation requires admin login. The MCP endpoint and search API are always publicly accessible.
Policies
Policies let you control which public documentation from the Context7 cloud is accessible to your on-premise instance. They do not affect locally parsed on-premise content. Access Policies from Settings > Policies tab. Requires admin login and a validLICENSE_KEY.
For details on source type toggles and library filters, see Customizing What Is Retrieved.
Web UI
Open your deployment URL in a browser to access the dashboard. From here you can:- Add and remove libraries
- Trigger re-indexing
- Monitor parsing status and logs
- Update AI provider settings, git tokens, and permissions
- Configure policies for public cloud documentation access
- Test MCP connectivity
- Change admin credentials